
UPDATE 7 March 2024: When Spectrum wrote nearly three years ago that e-bike ridership has “exploded,” we were not reporting on an isolated incident. E-bikes have continued to grow since then at a steady clip, although the continued increase did dip briefly in 2022 and ‘23 due to a range of factors including a war in Ukraine and economic turmoil. But what has not reduced in intensity or industry has been the range of options made available to DIY’ers to convert an old-fashioned pedal-and-spoke two-wheeler into an electrified, albeit homemade, wonder.
As the following article details, friction drives remain certainly a straightforward option, although if the comments posted on Reddit’s r/ebikes forum about friction drives provide any reliable guide, it is an option with its detractors as well.
Not to worry, a couple other categories of e-bike conversion kits remain popular, though generally with higher technical degrees-of-difficulty in completing than the friction drive. There’s the mid-drive conversion approach, which lets a motor do the thing your feet would be doing if the two-wheeler remained a regular old bike. Two downsides are that mid-drives tend to be more expensive and require more doing to make the DIY conversion. That said, Reddit’s r/ebikes forums seem slightly more even-tempered on the mid-drive option. A number of specialized kits remain, including swapping out a whole wheel for an e-bike version of same—although that of course requires an electrified wheel that happens fits all the relevant dimensions of your original bike (wheel conversions are done for both front and back, though back conversion tends to make a smoother ride). And that’s not always easy or maybe even possible. In which case, there’s a good story we could recommend about a friction drive conversion that’s available to be done, well, on the cheap. —IEEE Spectrum
Original article from 20 August 2021 follows:
In 2009, I wrote in these pages about my efforts to add an electric motor to a bicycle—a project that involved a considerable outlay of money and many hours in a machine shop behind a lathe. At the time, e-bikes were still rather exotic, at least in the United States, so it seemed worth the expense and effort to build my own.
Fast forward a dozen years. E-bike availability and ridership have exploded. Purpose-built electric bikes and e-bike conversions using hub-motors are now commonplace. One thing that hasn’t really changed, though, is the expense. If anything, it’s gone up. Consider the two e-bikes described in this month’s Gizmo column, which each cost thousands of dollars.
That got me thinking, how hard would it be, and how much would it cost, to do a simple conversion now? Thanks to a few recent technical and commercial developments, I was able to come up with an e-bike conversion that cost me less than US $200 and yet functions impressively.
The approach I adopted is mechanically as simple as you can get. It uses an “outrunner” motor designed for electric skateboards. With such outrunners, the case of the motor rotates. Driving the bike with it merely requires mounting it to the frame in such a way that the case is in contact with the rear wheel.
I’d read about such friction-drive arrangements and had followed the work of a cyclist in Australia known as Kepler who had devised a clever articulated mount that allows the motor to retract from the wheel when not applying power. He’d been selling kits for his mount in small numbers. But Kepler’s newest approach keeps the motor in constant contact with the wheel, which allows for regenerative braking. I thought: “What could be easier?”
So I bought an outrunner motor designed for electric skateboards for $88 and fashioned a mount for it out of a few pieces of scrap aluminum. The motor attaches to my bike under the chainstays, directly behind the bottom bracket. In that position, it’s hardly visible. While it would have been nice to engineer some sort of spring-driven mechanism to control how forcefully the motor pushes against the tire, I kept things simple: I just deflated the tire somewhat, bolted the motor solidly in place, and reinflated the tire.
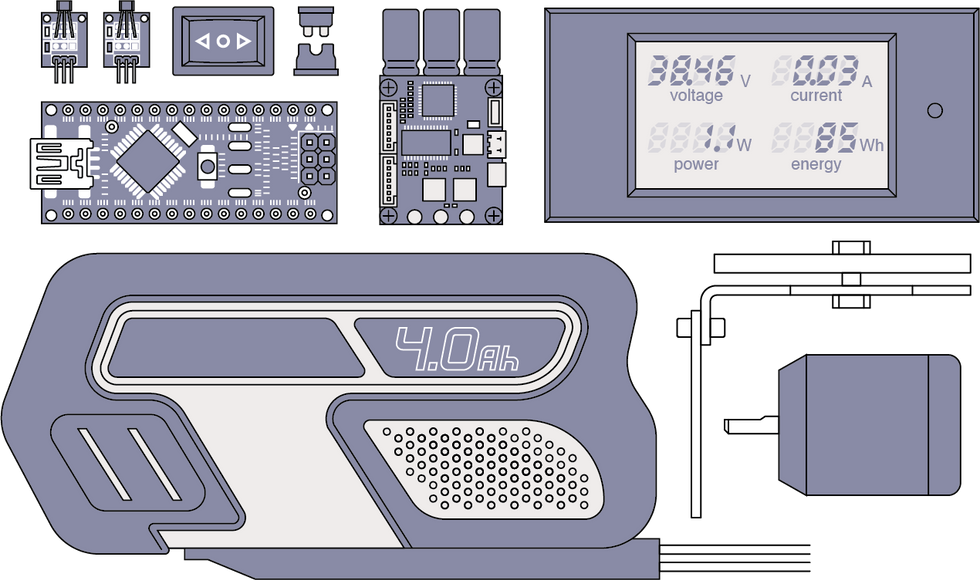 Most components are inexpensive and readily available. The only part I needed to fabricate was an aluminum mounting bracket for the motor [shown in outline]. James Provost
I next needed to decide on an electronic speed controller (ESC) to power the motor. For that I took advantage of the open-source VESC Project created by Benjamin Vedder. His work includes sophisticated hardware and associated firmware, as well as elaborate configuration software. Being an open-source design no doubt keeps the price of this hardware down: The controller I bought set me back a mere $85.
The third essential element of any e-bike is, of course, the battery. Here I took advantage of already owning an electric lawnmower, figuring that the 40-volt, 4-ampere-hour battery I had for it would serve well. All that was needed was a suitable adapter, which I bought for $18 from Terrafirma Technology, a company started by an engineer named Michael House who has gone into business supplying 3D-printed adapters to people who want to repurpose lithium-ion power-tool batteries.
On the handlebars are three controls: a momentary rocker switch operated by my right thumb and two Hall-effect sensors, which are switched when I squeeze the brake levers, to which I glued small neodymium magnets. These switches are wired to an Arduino Nano, which sends the appropriate signal to the speed controller.
The lack of noise, combined with the discreet positioning of the motor and other components, makes it hard for anyone to notice that I’m on an e-bike.
The most challenging part of this project was figuring out how to configure the ESC. Vedder’s software contains “wizards” to help, but it’s still complicated. Using it forced me to consider the difference between motor amps and battery amps and the virtues and drawbacks of controlling a motor by setting a target motor current or by changing the applied duty cycle.
I settled on controlling the motor current, which I adjust with the thumb-operated rocker switch on the handlebars. Squeezing the rear brake (which I’d normally rarely use on a road bike) applies a small amount of regenerative braking before the pads make contact–just as in my wife’s Prius. Applying the front brake cuts power to the motor without triggering regenerative braking.
My first test ride convinced me that I needed some quantitative feedback about what the motor was doing. It would have been possible to have such information displayed on a smartphone, using a Bluetooth module plugged into the ESC. But I was in a hurry and simply mounted on the handlebars a Drok meter, which I had purchased for an earlier bicycle-based battery-charging project.
Setting the speed controller to use current control initially confused me when I tested it with the rear wheel in the air. With the power setting fixed, the wheel would spin increasingly fast and the amperage drawn from the battery would steadily increase. Online discussions convinced me, however, that this is the expected behavior when commanding a motor to maintain a fixed amperage in its windings (thus applying constant torque) while under little load
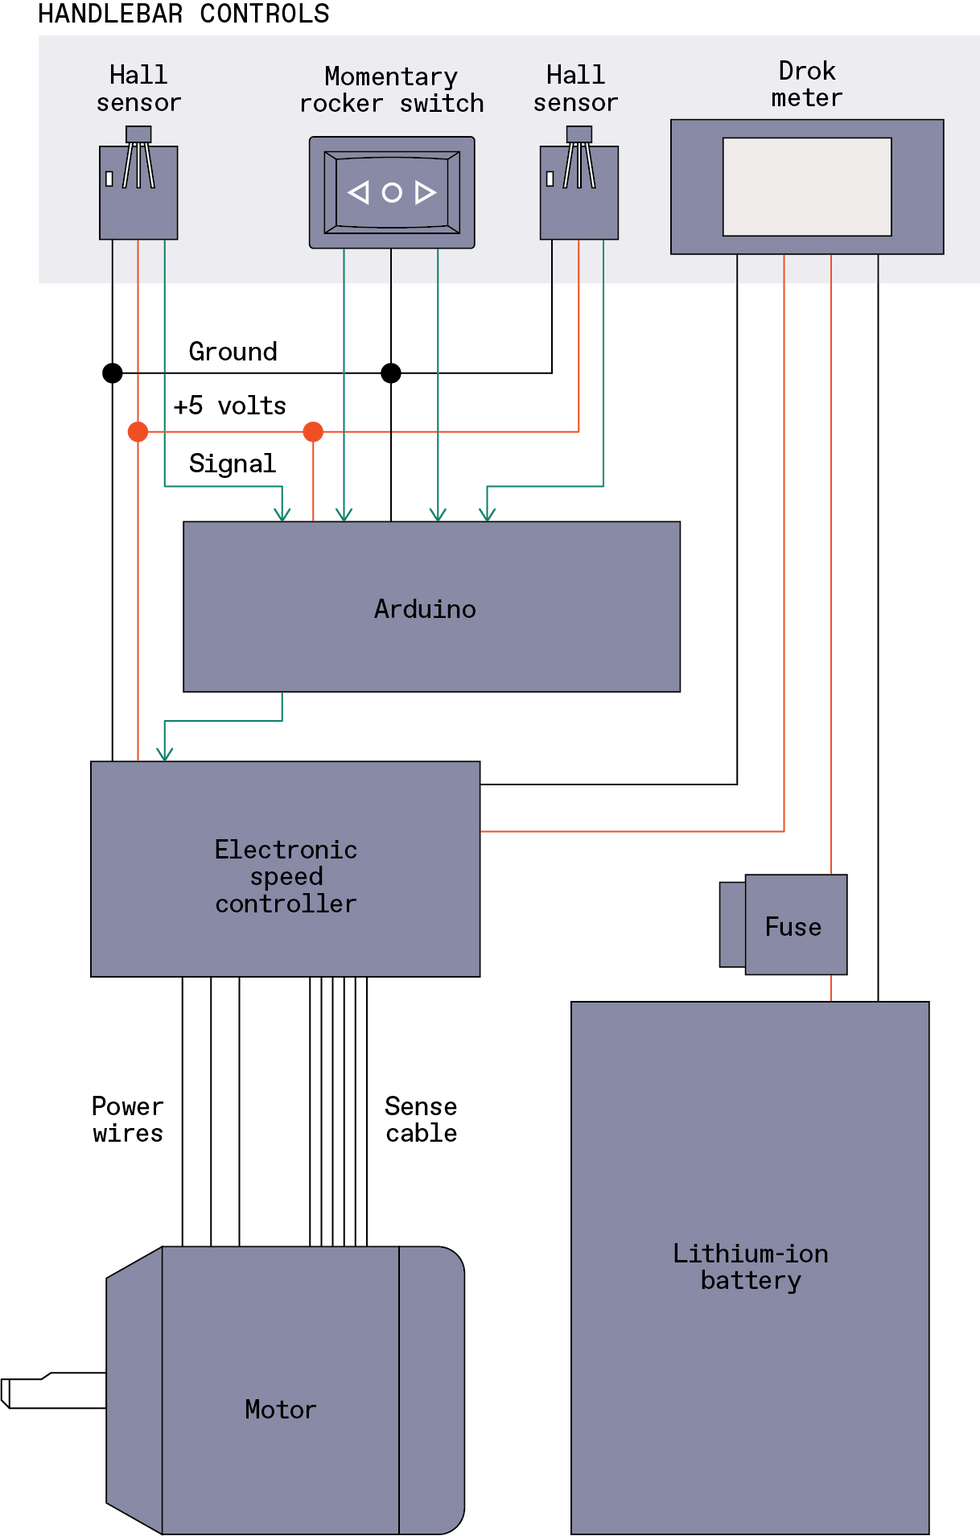 The handlebar-mounted controls connect with an Arduino, which interprets their settings and translates them into a PPM signal, which is applied to the electronic speed controller. The speed controller is connected to the motor and battery in the usual fashion, with an automotive-type blade fuse in line for safety.James Provost
This took some getting used to, but now I have the strategy down: I use the thumb switch to control how fast the bike accelerates and when I reach target speed, I tap my front brake, which returns the controller current setting to neutral. I can then goose it up from there as needed to maintain the desired speed.
The electric assist is virtually silent, because there’s no gearing to make noise and because Vedder’s electronics use quiet field-oriented control to power the motor. At speed I can’t hear the motor at all. The lack of noise, combined with the discreet positioning of the motor and the fact that the battery and electronics are hidden inside a trunk bag, makes it hard for anyone to notice that I’m on an e-bike.
I took advantage of that stealthiness during an early test ride. While loitering along, experimenting with the controls, I was passed by a college student on a mountain bike who must have thought this gray-bearded old-timer on a four-decade-old 12-speed was huffing and puffing. So I poured on the juice and blew past him, thereafter maintaining Tour de France speed. As I raced ahead, I chuckled to myself. “OK boomer,” indeed.
This article appears in the September 2021 print issue as “An Instant E-bike.”
- The Hybrid E-Bike - IEEE Spectrum ›
- Two e-Bikes to Consider for the Post-Pandemic Commute - IEEE ... ›
- NYU Researchers Pave the Way for Future Shared Mobility ›
- Can This DIY Rocket Program Send an Astronaut to Space? - IEEE Spectrum ›
- The World’s Most Popular EVs Aren’t Cars, Trucks, or Motorcycles - IEEE Spectrum ›
- “Porsche of E-Bikes” Stokes Greyp Expectations - IEEE Spectrum ›
- Olympics Officials Work to Prevent Motor Doping in Cycling - IEEE Spectrum ›


