While driving home one night recently, I saw a spectacularly bright meteor flash across the sky in front of my car. A good-sized chunk of interplanetary detritus must have been on its way to a crash landing not too far away, I said to myself. My next thought was that if I had a bearing on that luminous streak, and if at least one other person in my region also had such information, we might be able to triangulate on it and narrow down where any landing zone might be. I’m, of course, not the only one to ponder this possibility—and, I soon learned, people have indeed successfully found meteorites this way.
One example occurred in 2012, when a fireball lit up the sky over Northern California. Images of the meteor were recorded by a project called CAMS ( Cameras for Allsky Meteor Surveillance)—a project of NASA and the SETI Institute. These observations allowed the object’s trajectory and landing zone to be estimated, and coverage of the event in TheSan Francisco Chronicle soon led to the discovery of what became known as the Novato Meteorite.
CAMS is not the only such project looking for meteors. Another is the Global Meteor Network, whose mission is to observe the night sky with “a global science-grade instrument.” Organizers of this network even provide guidance for how anyone can build a suitable camera based on the Raspberry Pi and how to contribute observations that can help determine the orbits of the parent asteroids that spawned particular meteors.
I was tempted to join the cause, but after reading more on the subject I discovered alternative strategies for building a camera to survey the night sky. Ultimately, I decided that I wanted to capture attractive color images more than I wanted to contribute data to the Global Meteor Network, which uses black-and-white cameras because of their greater sensitivity.
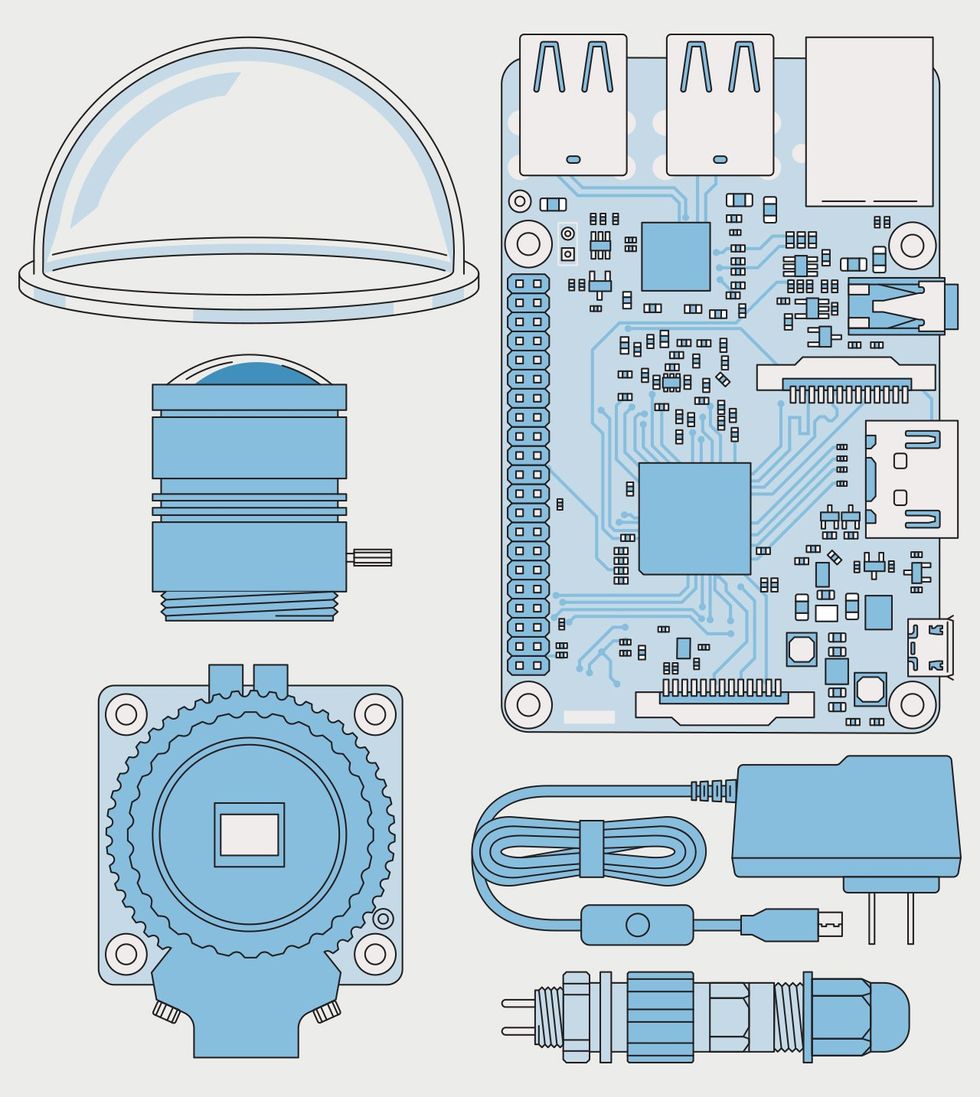 The required components include a Raspberry Pi microcomputer (case not shown), a Raspberry Pi High Quality camera, a lens, a dome-shaped transparent lens cover, a 5-volt power supply, and a waterproof bulkhead connector, allowing AC-mains power to pass through the wall of the waterproof enclosure (not shown) holding the camra.James Provost
So I opted to build a different kind of all-sky camera, one that is also based on a Raspberry Pi but that uses the Raspberry Pi High Quality color camera, following the lead of a project called, reasonably enough, Allsky Camera.
The hardware for this project consists of a Raspberry Pi and either the Raspberry Pi HQ camera or one of the purpose-built planetary cameras made by ZWO. To be truly “all sky,” the camera should be equipped with a fish-eye lens having a 180-degree field of view. Recognizing that my home is surrounded by trees, I opted for a lens with a narrower (120-degree) field of view. A modern Raspberry Pi 4 is recommended, but I used a several-year-old Raspberry Pi 3 Model B simply because I had it on hand. I decided to use a US $60 Raspberry Pi HQ camera over a ZWO camera because it offered higher resolution.
To protect this hardware from the elements, I housed the Pi, camera, and a suitable wall wart for powering the Pi inside a $25 waterproof plastic enclosure. The opening I cut for the camera lens is covered with a $16 clear acrylic dome. The first dome I purchased distorted things, but I ordered another one that worked out much better. I also purchased an $11 case for the Raspberry Pi (one that included a fan) and a long extension cord, which I cut and connected to a waterproof bulkhead connector. This means I can leave the unit outside even when it rains.
Following the guidance provided in a very nice tutorial video, I found it straightforward to set up the Allsky Camera software on my Pi, running it in a “headless” configuration—meaning without a monitor or keyboard. I access it wirelessly from a laptop through my local area network using SSH.
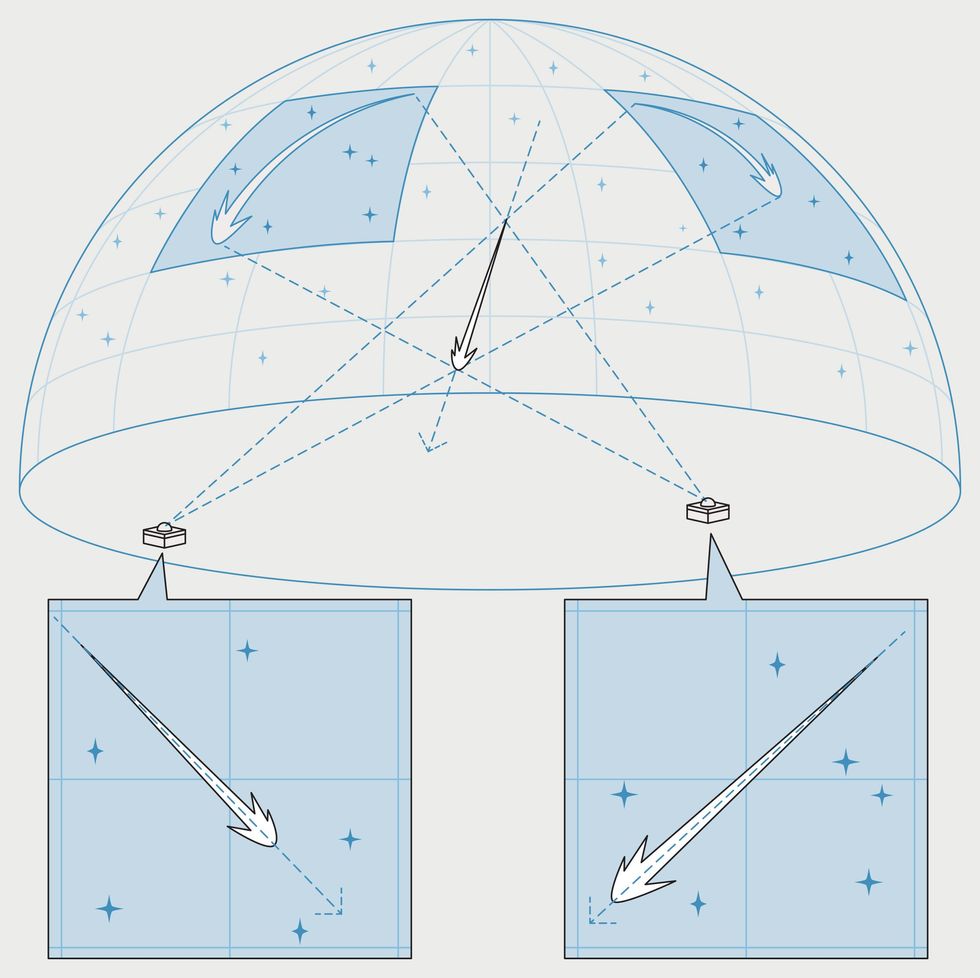 A meteor’s trajectory through the atmosphere can hold clues to the location of any part of it that survives and also reveals the orbit of the parent body around the sun. With images of the meteor trail captured by two cameras, that trajectory can be ascertained: The position of a glowing trail relative to the background stars in an image defines a plane, and the intersection of two planes defines the trajectory.James Provost
I fired everything up—but the camera didn’t work at all. So I turned to the appropriate troubleshooting section in the project’s ample documentation and tried what was advised there—to enable “Glamor” graphic acceleration on the Pi. Still no images, though. Eventually, I discovered some tweaks to a configuration file that are needed when using the HQ camera on a Pi 3B, which allowed me to obtain a hopelessly blurry image of the ceiling of my office.
Through trial and error, I was able to get the manual focus of the camera dialed in properly. And slowly I learned how to adjust the multitude of settings available in the Allsky Camera software, which is done either by editing a configuration file or, more conveniently, through a Web interface this software provides.
For example, I learned that I should reduce the resolution of the images used to make time-lapse videos, lest images saved at the impressive native resolution of the HQ camera (4,056 by 3,040 pixels) overwhelm the processing and storage available on my Pi. While that required tweaking a configuration file, other settings can be adjusted using the Web interface, which also makes it very easy to view live images, browse images collected earlier, and view and save time-lapse videos.
This timelapse video shows the night sky giving way to the rosy-fingered dawn, as captured by this all-sky camera.Spectrum Staff
One thing that puzzled me early on was how well such a camera would work to catch meteors flashing by, given that the camera takes still images, not many-frames-per-second videos. But my concerns diminished after capturing images of the night sky over my home, some of which caught the light of passing aircraft. The long trails of light in those images made it apparent that the exposure time must be at least some tens of seconds long. I knew these were aircraft, not meteor trails, because the streaks included parallel tracks (from wingtip lights) and obvious pulsations from strobes.
I hope yet to capture meteors some day with this gizmo. For that, I may go camping in the mountains in mid-August, when the Perseids are hitting their peak. My family and I had taken such a trip years ago, but I didn’t have an all-sky camera at the time. So I returned home with only some now-fading memories of the wonderous show nature had put on display above our heads. Next time, I’ll have something I can view over and over!
- Detect Solar Flares and Gamma-Ray Bursts for Less Than $100 ›
- Track the Movement of the Milky Way With This DIY Radio Telescope ›
- DIY Exoplanet Detector ›
- The Marimba Virtuoso’s Desktop Planetarium - IEEE Spectrum ›