Now you (yes, you) can measure Planck’s constant and use quantum mechanics to measure mass from the comfort of your own home or classroom—using LEGOs.
In 1960, the meter was re-defined in terms of time (the current definition is the distance light travels in 1/299 792 458 seconds). That left the kilogram as the lone fundamental unit of the International System of Units (SI) defined by a physical object rather than universal constants.
In 1990, some electrical measurements split off from the SI, establishing a “conventional” system that defined basic electromagnetic units in terms of the Josephson and von Klitzing constants (KJ=2e/h and RK=h/e2, respectively, where e is the charge of an electron and h is Planck’s constant—and h90=6.626 x 10⁻³⁴ m2 kg /s is the best value for h available in 1990).
The movement for a physical-constant-defined kilogram gained urgency late in that decade, when an international recalibration some reference kilograms were putting on weight, thanks to the thinnest of possible coatings deposited from the air. Since Planck’s constant explicitly connects the kilogram to units that are already constant-defined, it is the final key to a system of measurements that can be replicated, in theory, by anyone, at any time, at any place.
The pursuit of the quantum kilogram has focused on instruments called Watt balances, with occasional side-trips into matter waves. Watt balances at the U.S. National Institutes of Standards (NIST) and other national laboratories have pushed measurement precision to a few parts per hundred million, using techniques that are beyond the reach of the classroom or kitchen metrologist. Thanks to this work, it appears that a redefined kilogram may be achieved by 2018, allowing a fundamental revision of the SI and its reunification with the “conventional system.”
The physics and the testing methodology are both complex. But over the past few years, researchers at NIST’s Physical Measurements Laboratory have developed a do-it-yourself device that demonstrates the Watt balance’s physical principles and measurement methods at a scale, and a price, suitable for a classroom or home.
In a paper posted on ArXiv and submitted to the American Journal of Physics, the NIST researchers (joined by collaborators from the Joint Quantum Institute at the University of Maryland) show how to build—and understand—a Watt balance that can measure Planck’s constant and mass to within one part in a hundred. The device measures the electric power needed drive an electromagnet to balance a given mass. It uses 392 LEGO bricks, a USB data acquisition (DAQ) controller, a USB-controlled four-channel analog output device, a photodiode, two $15 lasers, some miscellaneous resistors, four ring magnets, some brass rod and a scrap of PVC pipe. The total cost is $633.77 or less: The two USB controllers account for $389 of the price tag; if you have them, or make a less expensive substitution, the project cost plummets.
In 2013 and 2014, a quintet of NIST researchers—Leon S. Chao, Stephan Schlamminger, DB. Newell, J.R. Pratt and Xiang Zhang—built three prototype LEGO Watt balances. These were “received with enthusiastic responses“ by science fair attendees, students, and NIST visitors. The demonstration project ties together elements whose relationships may not be readily evident: Planck’s constant at the quantum level and mass at the level of the gram, kilogram, or even galaxy.
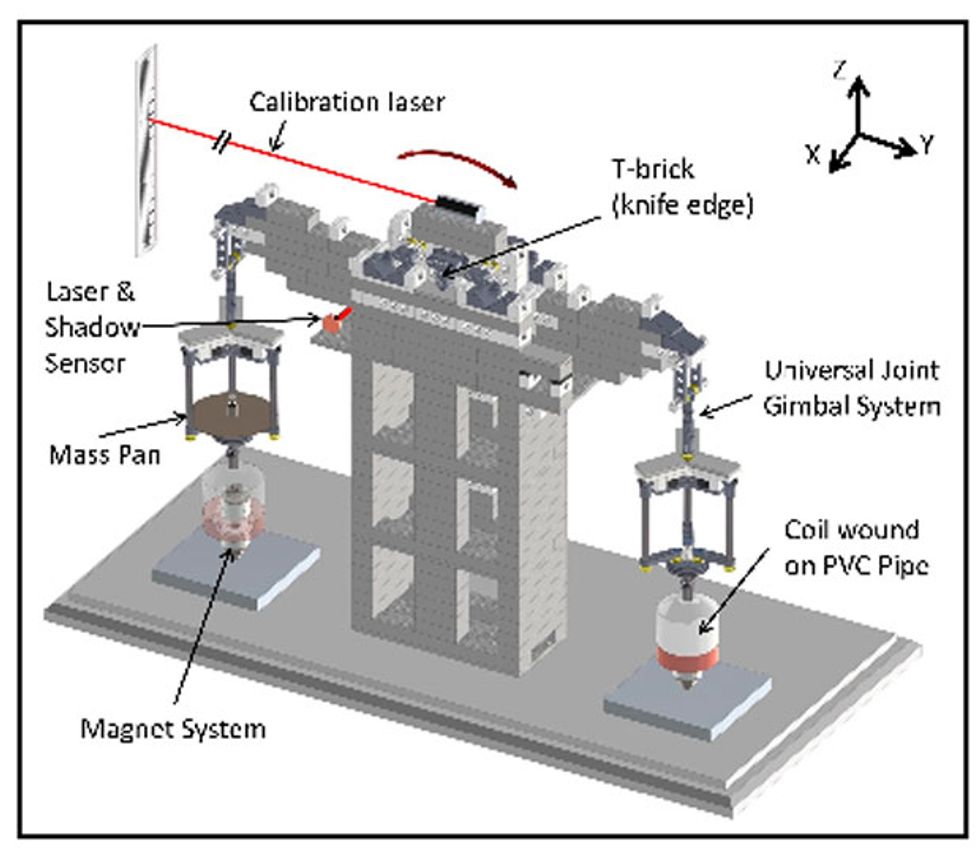 Diagram of LEGO Watt balance.Image: S. Schlamminger and X. Zhang/NIST
The LEGO Watt balance is patterned on the familiar analytical balance, with a two-armed rocking beam balanced on a knife edge. Weighing pans hang on gimbals at the end of each arm. And beneath each pan hangs a short piece of wire-wrapped PVC pipe. Each induction coil can move up and down over a pair of neodymium ring magnets, threaded on a vertical brass rod affixed to a base plate. Two sub-milliwatt lasers report beam displacement: One shines under the beam onto the photodiode (at about $62, the most expensive component after the controllers). As the balance beam rocks, it casts a shadow on the diode; the photodiode output measures the balance’s oscillations. The other laser is fixed to the top of the beam. It shines on a ruler or a sheet of graph paper taped to a wall a couple of meters away. This gives very sensitive reading of the beam’s total displacement. When fully assembled, the balance weighs about 4 kilograms and stands about 36 centimeters tall, with a 43 cm by 10 cm footprint
In operation, the balance illustrates concepts of mass, gravity, current, and voltage, along with flux density and flux integral, while teaching some fundamentals of metrological practice.
The LEGO balance works in two modes: a “velocity mode” for electrical calibration and a “force mode” for measuring mechanical forces and mass.
In velocity mode, the LEGO instrument senses current in one of the coils (under Pan A, say) as it moves through the field of the static magnets. To calibrate the system, operators drive the opposite coil (under Pan B) with an oscillating current. By plotting displacement against current, the NIST researchers (and the students who, one hopes, will follow them) calculate the velocity-mode flux integral (flux density times wire length, in units of volts/velocity).
In the force-mode step, the device is used to measure the current needed produce enough force to counteract masses in the pans. In seven steps, the operator adds and removes weights on both sides of the balance, each time changing the voltage to bring the laser dot on the wall back to the balanced position. (An experienced operator can complete calibration and measurement in about 30 minutes.)
- Step 1: Balance the empty pans.
- Step 2: Add an arbitrary mass of a few grams to Pan B, and record the current needed to re-center the balance.
- Step 3: Add a calibrated reference mass to Pan A, and again alter the current to re-center.
- Step 4: Remove the calibrated mass from Pan A; measure current again.
- Step 5: Put the calibrated mass back in Pan A, and measure again.
- Step 6: Remove the calibrated mass from Pan A again, and re-center.
- Step 7: Remove the arbitrary mass from Pan B and verify that the unloaded balance remains stable.
The user combines the current readings to calculate how much current would be needed to balance the calibrated Mass A alone. From the measured current and the known mass, the operator calculates the force-mode flux integral. (This is the current divided by the product of the mass and the gravitational constant, g. The value of g varies slightly from place to place, so LEGO balance users should consult the U.S. National Geological Survey web service that provides predicted local values for g, based on the user’s latitude, longitude, and elevation.)
The force-mode flux integral (BFF) depends on SI units. The velocity-mode flux (BFV), is based on purely electrical measurements and implicitly includes h90. And the ratio of the two is the same as the ratio of the SI Planck’s constant to h90 (that is, BFF/BFV = h/h90). Solve for h and you’re at the forefront of metrology.
Edited 16 December 2014 to update affiliations to conform to revised ArXiv paper.