
I’ve been increasingly intrigued by electronic music, sparked in large part by covering an exhibition of designer theremins for IEEE Spectrum in 2013, followed by watching documentaries such as 2014’s I Dream of Wires, which traces the history of the modular synthesizer. One notable cohort in the modern electronic music scene are the circuit benders. These folks modify all sorts of audio-enabled equipment, including children’s toys and digital keyboards, to produce sounds definitely not intended by the designers. So when I came across the Casio SK-5 keyboard [pdf] I’d received for my 14th Christmas lurking in my parents’ attic, I pounced.
Released in 1987, and aimed at younger players, the Casio SK-5 was never intended to be used by serious musicians. The keyboard had only 32 “minikeys” sized for smaller fingers, and it could play just four notes simultaneously. The SK-5 could mimic a number of instruments, but its killer feature was that you could create your own instrument sounds through sampling audio (at a whopping 8-bit resolution).

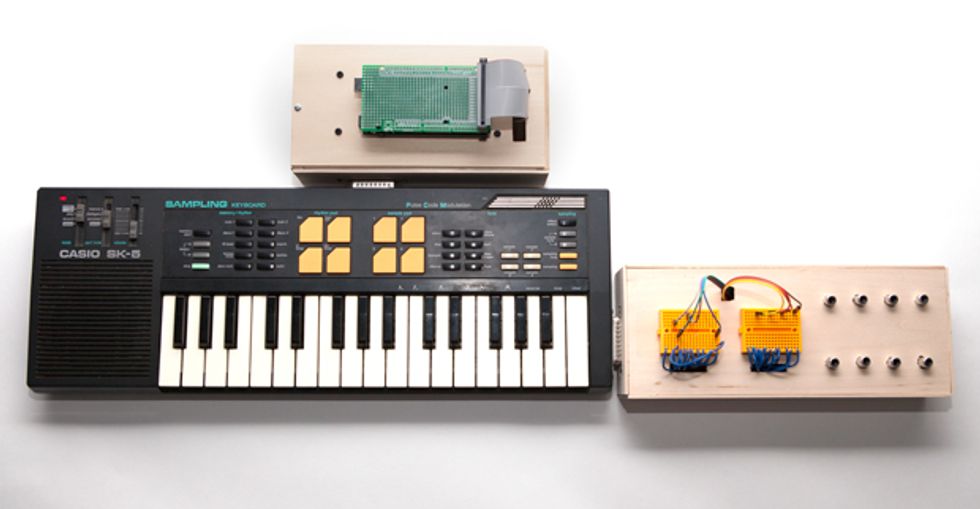
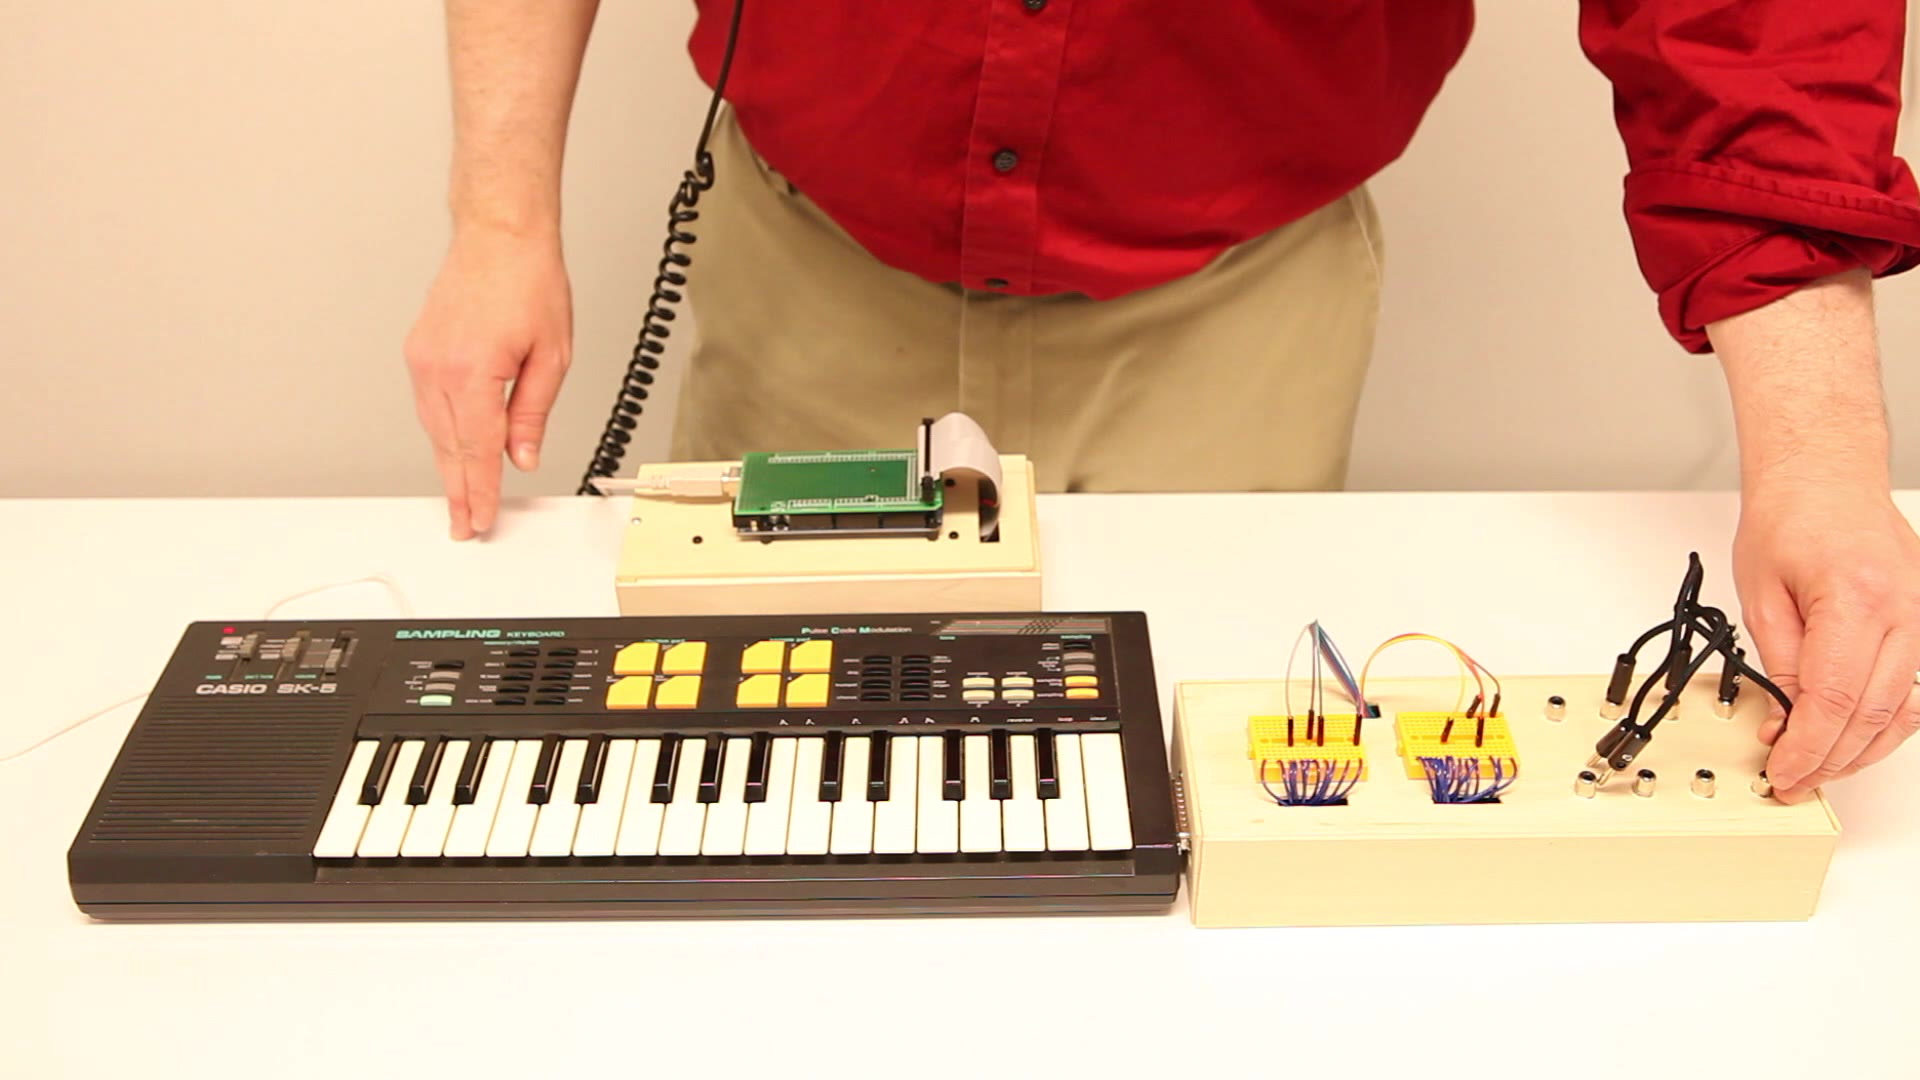
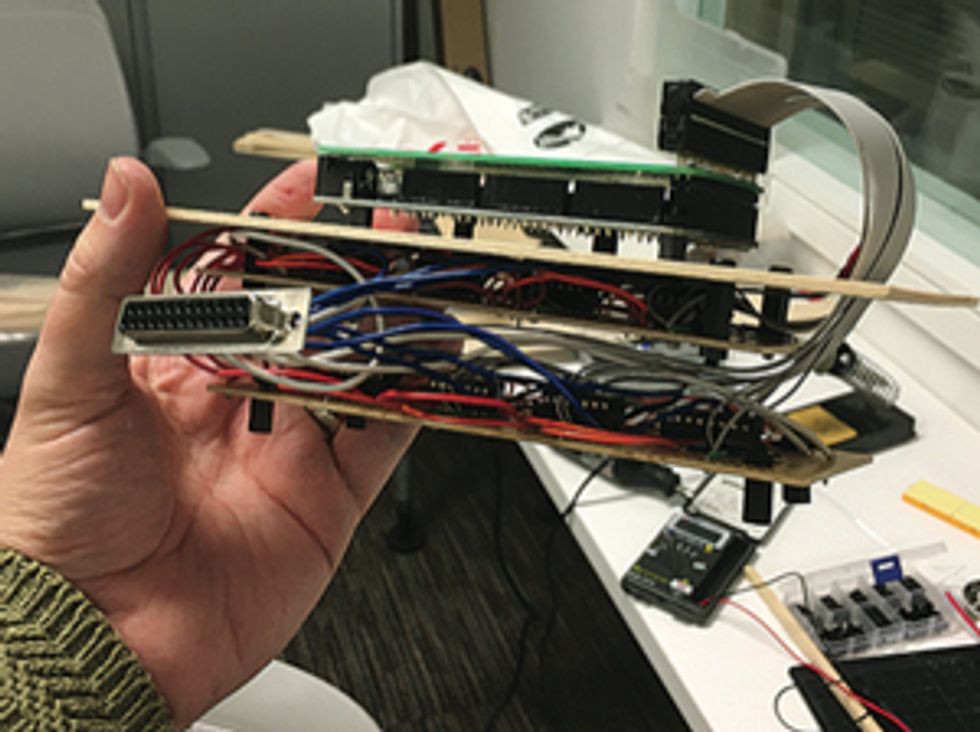 I wired DB-25 connectors to the Casio SK-5’s sound-synthesis chips and 32- key keyboard (top). I made a patchboard for the synthesis chips by mounting some RCA connectors in a box that attaches to the chips (second from top). The keyboard is controlled by an Arduino Mega using eight four-switch ICs (second from bottom). To fit the circuit into a reasonably compact box, I sandwiched the circuit boards (bottom).Photos: Stephen Cass (4)
I had originally set about trying to learn to play the SK-5, but I hit a wall when my teach-yourself-piano book introduced chords. The four-note limit made it often impossible to play both the chords and the melody of a song at the same time. Consequently, my friends and I mostly used the SK-5 to perform its preprogrammed demo tunes using a fine selection of sampled burps.
Since then, the SK-5 has become very popular among circuit benders. You can pick one up on eBay for under US $100, and instructions for modifying the keyboard are easily found online. (The basic principle is simply to ground or cross-connect pins belonging to the audio-synthesis chips.) You can either do this yourself or send your keyboard away to be professionally modded.
But these instructions generally call for ripping out the SK-5’s built-in speaker. In its place go patch-panel connectors or switches wired to the chip pins (so that different bends can be used during a performance via patch cables or flipping switches). I wanted to retain the option of using the keyboard in more or less its original state and give myself the option of trying different types of bending systems as my interests developed.
The existing guides also failed to solve another pressing issue: I still can’t play the piano.
But after opening the SK-5’s case and poking around for a bit, I realized I could solve both problems. Although the SK-5 uses two 28-pin synthesis chips, many of the pins between the two chips are already interconnected. Eliminating duplicate ground and power lines and a few pins that didn’t seem to produce any interesting results brought me down to 25 pins—which just happens to be the perfect number for a DB-25 connector. And the SK-5 keyboard is really just a 32-button matrix keyboard that uses a 12-wire cable—four return wires and eight lines for the scanning pulses—so I figured it would be easy enough to find a way to simulate key presses under computer control.
I carved a hole in the case of the SK-5 closest to the synthesis chips. Using a soldering iron and some wrapping wire, I connected the chips to a DB-25 and screwed it into place in the hole. I repeated the operation at the back of the SK-5 to connect the keyboard cable. Then I closed up the case and set about building two boxes.
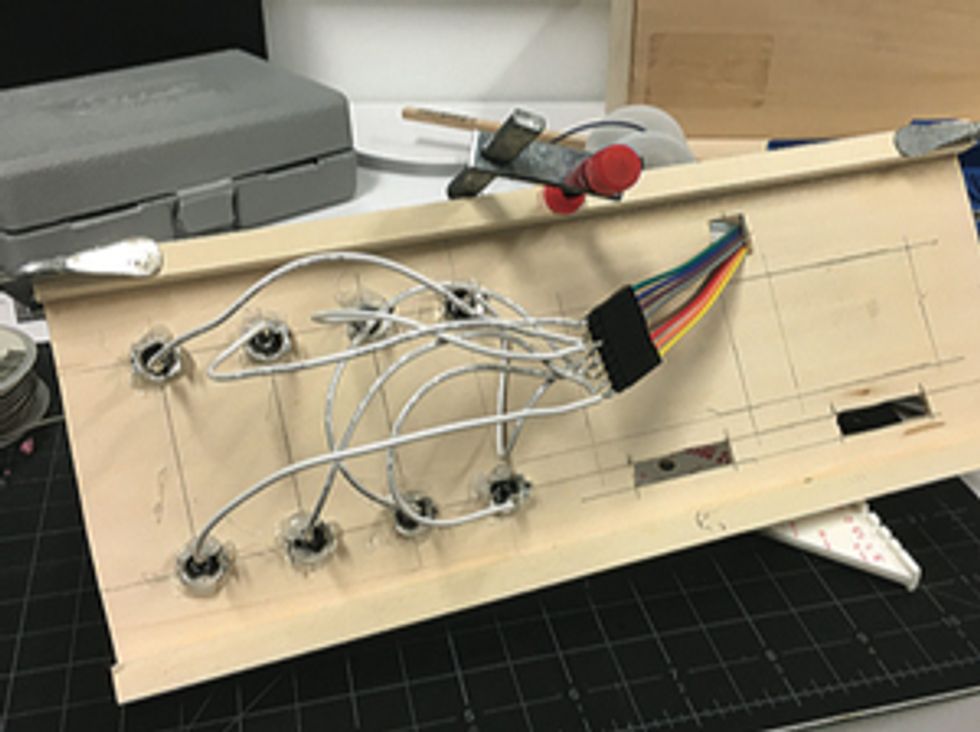
The first box has two breadboards and a patch panel with eight sockets on top and a DB-25 connector at one end. The breadboards allow the patch-panel sockets to be wired to different synthesizer pins, and allow the option of making semipermanent bends using jumper wires. Soon I had all kinds of weird sounds coming out of the keyboard.
The second box attaches to the keyboard switch matrix. Initially I thought I could simply hook the 12 matrix wires directly to the digital pins of an Arduino Uno. My plan was to detect the probing pulses on the scan lines, and respond with a 5-volt signal on the appropriate return line, mimicking the matrix’s response to a key press.
But the results were terrible. The Arduino simply couldn’t respond reliably enough to the 1.9-millisecond-long pulses. Using hardware interrupts might have helped, but the only Arduino boards with enough interrupts available for eight scan lines operate at 3.3 V, rather than the 5 V used by the SK-5.
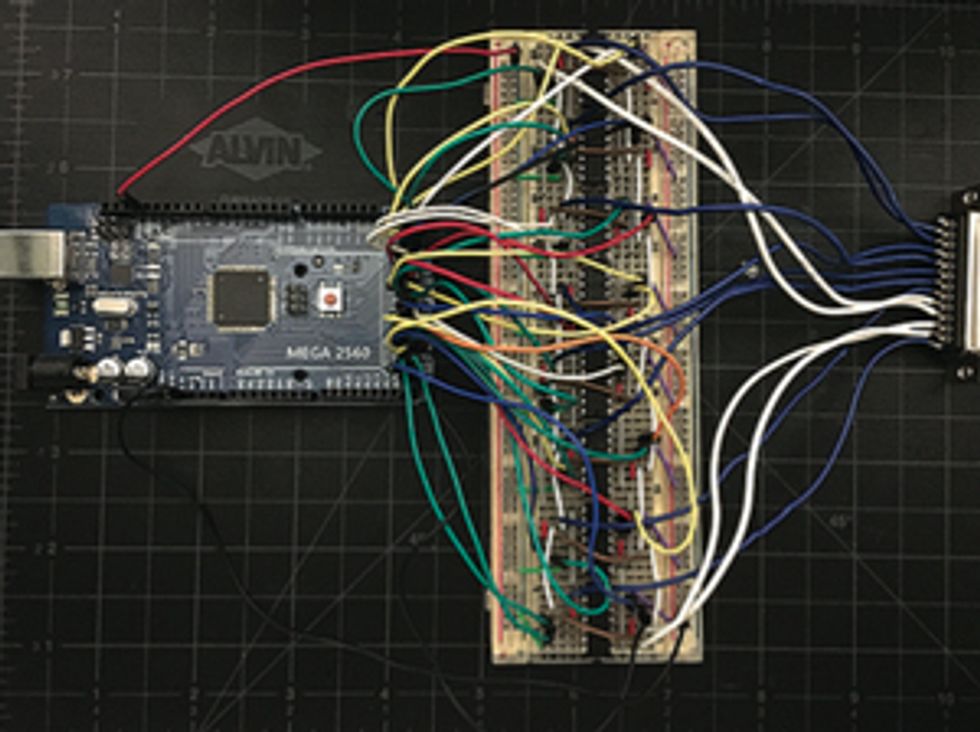
So instead I used eight 4066 ICs. Each 4066 has four switches that can be opened and closed by a control signal. Using two perf boards, I connected the ICs to the keyboard’s wires so as to electronically duplicate the switch matrix. I now had 32 control lines to deal with, so I ditched the Arduino Uno in favor of an Arduino Mega. I mounted the Mega on top of the box housing the perf boards. Powering pins on the Mega simulates different key pushes on the SK-5 without the need for millisecond response times: Even at its sloppiest, my software still beats the precision of human fingers.
By looping slowly through each pin in turn and listening, I was able to map each pin to the note it produces. Writing software to play music was then just a matter of converting sheet music to an array of bytes corresponding to the required pins, with a few extra codes thrown in for things such as sustaining notes or rests. I tested the system with the “Hello, World” of electronic music—a few bars of the melody from the Super Mario game theme song.
This, of course, is just an ersatz reinvention of the MIDI musical control system. Real MIDI would let me download any number of tunes to my laptop and play them through the SK-5 without laborious conversion. And in fact you can buy MIDI modification boards for the SK-5. But what I’m really interested in are the possibilities afforded by my system to generate notes algorithmically, with choices driven by sensors added to the Mega.
This kind of thing produces sound that falls into the abstracted realm of the subgenre of electronic music known as “noise,” which is to, say, pop or classical music as a Jackson Pollack painting is to a Caravaggio or a Van Gogh. Perhaps fortunately for my wife and colleagues, there’s a soundproof media room at Spectrum’s office for me to experiment in.
This article appears in the May 2016 print issue as “Circuit-Bending a Vintage Casio.”


