I've been making electronics projects for 15 years, but strong security was something I always considered out of my reach. Consequently, a fear of getting hacked limited the types of projects I would pursue, especially Internet-connected devices. But in May of 2019, I was handed the job of designing a cryptographic product for my employer, SparkFun. Among other things, SparkFun designs and sells breakout boards that allow makers to easily incorporate the capabilities offered by various integrated circuits into their designs. Now SparkFun wanted a board that would provide an easy on-ramp into the world of hardware-based cryptography.
It had to be user-friendly and Arduino compatible, which meant sifting through the specs of a lot of cryptographic hardware. What functions should our board offer, and how should it implement them? Ultimately, I chose to focus on ECC (elliptical curve cryptography) digital signatures. I'll get into a quick explanation of what ECC is in a moment, but the appeal of digital signatures is that they have a great real-world equivalent—handwritten signatures—which makes them a good introduction to cryptography. And signatures are very useful in the world of embedded systems, especially for those communicating over an insecure channel, like a radio link.
I had an immediate test application: As I started my crypto research, I remembered that my garage door remote control had stopped working years ago. I had wanted to replace the system with something of my own design, but I was never confident I could make something secure. But now my research had an extra impetus.
Venturing into the world of cryptography was pretty daunting, but with enough reading I found my way to a few datasheets of chips that use ECC-based crypto. ECC is similar to the RSA encryption algorithm often used on the Internet—both use what's called a trapdoor mathematical function, which is easy to do but very hard to reverse. In RSA's case, the trapdoor function is the multiplication of two large prime numbers. If you have just the product of the numbers, it's very hard to factorize that back to its constituent primes, but if you know one prime and the product, it's trivial to do division and recover the other prime. With a trapdoor function in hand, you can create a private key and a public key. Anything encrypted with the public key can be decrypted only with the private key, and vice versa. In ECC's case, the trapdoor function is a hairy bit of math that exploits properties of points along an elliptic curve described by a formula of the form y² = x³ + ax + b. If you're willing to take on the math, ECC lets you use shorter keys than RSA does, so it's better for embedded devices with limited power and bandwidth budgets.
After quite some searching, and following the advice of Josh Datko at Cryptotronix, I came to the ATECC508A chip. It can do ECC signature creation and verification and talks I2C, the two-wire communications bus protocol that is well suited for Arduino compatibility. Time to order some samples!
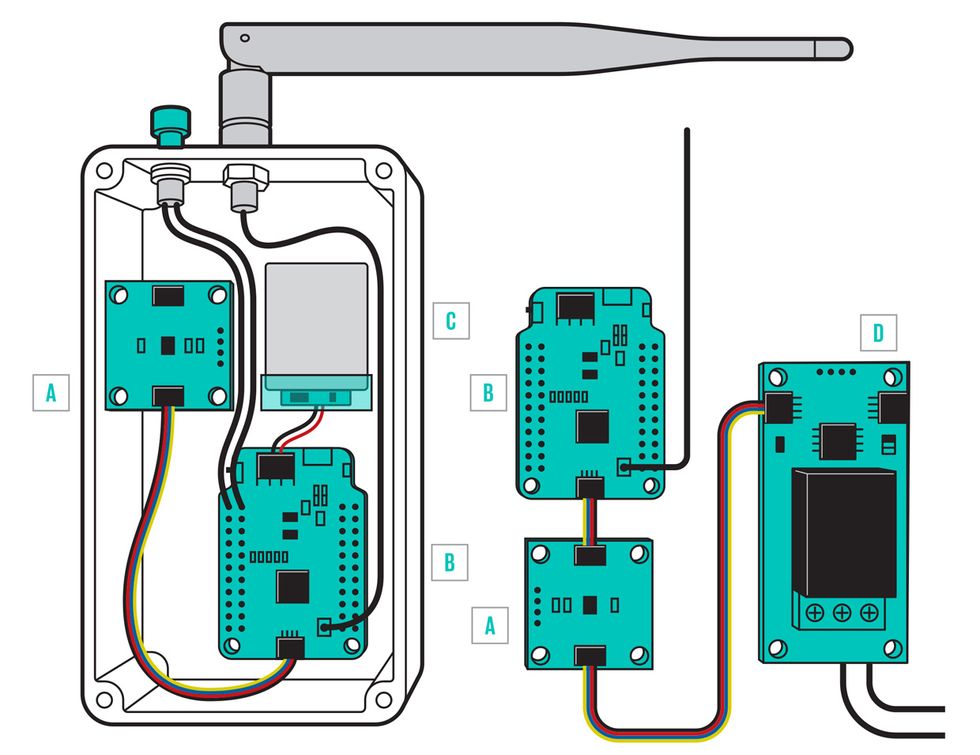 Cryptic Coprocessor: The ATECC508A coprocessor board (A) is connected to the Pro RF (B) in the remote (left), powered by a lithium polymer battery (C). In the base station, the coprocessor and Pro RF use the I2C bus to control a relay (D), which activates the garage door mechanism (not shown).Illustration: James Provost
The printed-circuit-board layout was fairly straightforward, and I had prototypes in no time. I plugged one in to my nearest Arduino, and it popped up on the correct I2C address. The hardware was verified. Now it was time for the difficult stuff: software!
The biggest hurdle was configuration. The ATECC508A has 126 configuration registers and there are many dependencies. If you attempt to change one thing, you often break another. Plus, in order to ensure the system is secure, once a configuration is chosen, it gets irreversibly locked: You only get one chance with these security ICs, so if you mess it up, then your IC is useless. Working very slowly and carefully, I nevertheless bricked several ICs (proud to say I never hit double digits). But I eventually found a suitable configuration that allowed for ECC signatures and verification. Whew! Finally I could begin writing examples for an Arduino library, demonstrating things like how to sign messages.
Now that the cryptographic coprocessor was completed, it was time to focus on fixing my garage door remote. The next big step was to add wireless communication. I opted to use a pair of SparkFun Pro RFs. They were nice to work with because they use an SAMD21 microcontroller with an I2C buffer large enough to handle the communications needs of the crypto coprocessor, and they have an onboard LoRa wireless transceiver, the RFM95. I initialized a crypto coprocessor, which creates a permanent private key—locked inside the coprocessor—and a public key which I could download via the I2C connection. (Step-by-step construction instructions and a bill of materials are available from the SparkFun site.)
I housed my remote in a sturdy aluminum case with a duck antenna and a single push button. Internally, it consists of my initialized crypto coprocessor board, a Pro RF, and a rechargeable lithium polymer battery. The normally open push button is wired between the battery and the Pro RF, so the board is off most of the time. Pressing the button for three seconds gives the board enough time to start up and complete the entire sequence to open the garage.
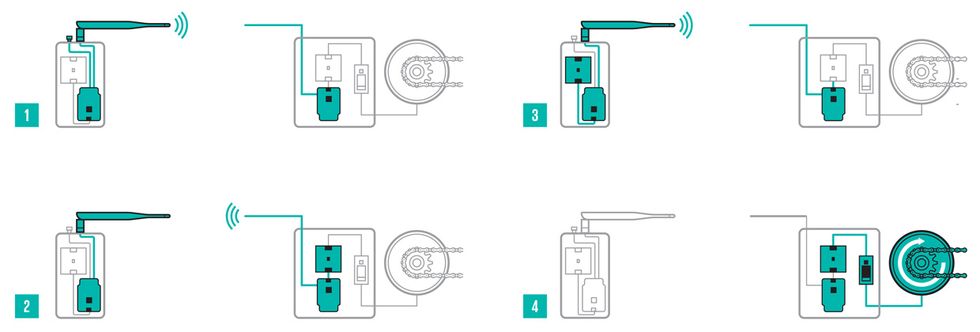
The sequence plays out like this: After boot up, the remote sends the string “$$" to the base station in the garage (consisting of the other Pro RF and another ATECC508A crypto board with a copy of my remote's public key). The base station creates a token of random data using its ATECC508A and broadcasts it. The remote receives this token and creates a signature by combining the token with its private key, and transmits the signature. The base verifies the signature using the remote's public key. The security comes from the fact that the only place in the world that contains the unique private key necessary to make a valid signature is inside the remote's coprocessor. If all is good (within a strict time window), then the base opens the garage.
Next up, I plan to venture into areas that I was previously uncomfortable with. Now with this coprocessor in my bag of tricks, and good security in my hands, I'm ready to take on even the most concerning of IoT devices: my front door lock.
This article appears in the March 2020 print issue as “Make a Hack-Proof Garage Door Opener."
This article was updated 3 March 2020.