
Although there's a certain awe-inspiring beauty to the images that hobbyists' weather balloons can capture from the edge of space, in fact most of the good stuff happens much nearer the ground.
These flights can be broken into three phases. The first, with cool imagery of the ground below, lasts about 10 seconds. In the second, the balloon starts to swing around wildly in the wind, and you get a long period of nausea-inducing footage. Finally, the balloon ruptures, transmitting a quicker but equally queasy view as it plummets earthward.
Since most of the interesting images come in the first 100 meters, why go higher? Besides, by keeping the balloon low, you can control the pan and zoom, rather than trusting to dumb luck.
Setting up a balloon for low-altitude observation involves some interesting logistical issues, but it isn't particularly difficult. To begin with, balloon flight is all about payload weight. The more you want to carry, the more lift you'll need, meaning a bigger balloon and more helium. In the United States, there's a practical limit to both: FAA Part 101 regulates what size and type of balloon can be operated without notifying the FAA prior to flight. Moored balloons can't have an inflated diameter of more than 6 feet (1.8 meters) or a capacity of more than 115 cubic feet (3256 liters). These requirements will pretty much drive all the other decisions you make.
The best source I've been able to find is Balloons Direct. It sells a US $35 chloroprene weather balloon with a 1.7-meter diameter and a total fill capacity of 2464 L—enough to lift 2.1 kilograms. I ordered two, just to be safe.
Next I needed a payload. There are lots of pan-zoom-tilt webcams around, but most require an Ethernet connection, which would leave little lift for the camera—an altitude of 30 meters would require an entire kilogram's worth of Cat 5 cable. I turned my attention to Wi-Fi–enabled webcams, settling on the Vivtek PZ7131. It features 640-by-480 resolution, a 2x optical zoom, and a wince-inspiring $340 price tag.
The camera required about 1.5 amperes at 12 volts. I could have used lithium-ion batteries, but because I had to tether it anyway, I decided to run 12 V up on a wire from the ground, using the power line as the mooring line as well. I spent an evening with my 15-year-old son braiding a 30-meter length of two-conductor wire out of some 22-gauge single-conductor wire and splicing it between a jack and a spare 12-V power cube. The lift penalty was well under half a kilo. A test confirmed that the camera received enough power to operate, so I was set.
I pulled a spare IEEE 802.11g wireless access point out of my closet and attached it to my MacBook via Ethernet. The camera found the access point, and the MacBook found the camera's Web browser interface, so now I had a balloon, camera, power, and networking. All that was left was the helium and the weather.
Helium isn't cheap these days. The only place it's being made locally is the interior of the sun, so we have what we have, and it's running out fast. Some analysts estimate that the cost of helium is about one-tenth of what it really should be, given the increasing scarcity.
In any event, your best bet is a welding supply house or industrial gas supplier. You'll want a 125 cubic foot (3540 L) tank, which is about 1.2 meters tall and is definitely awkward for one person to move around. You'll probably need to put down a deposit on the tank, and be sure to ask for a balloon inflator. That's one of those things you see at party stores, but it works for weather balloons, too. My tank, courtesy of Granite Industrial Gases, in Derry, N.H., set me back $60, and the company lent me the inflator for free.
The last hitch was the weather. As a bunch of NASA scientists learned in the spring of 2010, a good wind can turn a small static load (the Nuclear Compton Telescope) into a large dynamic load that might bounce off a fence and a car. (In that case, the balloon detached from the crane holding it and went for a ride across 45 meters of Australian terrain.) I had no desire to see a $340 camera go sailing away because the mooring line broke. And even a modest wind would send the balloon spinning, ruining any good images.
It took several weeks for work and weather to align, but I finally woke up to a sunny November morning with only light winds. I hooked the inflator up to the helium tank, fitted the neck of the balloon over the inflator, and created a good seal around the neck with zip ties. The inflation took a good 10 minutes, in part because I kept stopping to estimate how full the balloon was by pushing on it.
With the balloon inflated, I used more zip ties to close off the neck, removed the first ties, and carefully started moving it to the open area I planned for launch. I got as far as the porch. The balloon brushed a plant hook and burst spectacularly. Good thing I had another!
I moved the tank out into the driveway and repeated the process, this time without a hitch, although I was pretty conservative with the amount of helium. I had the MacBook, the access point, and the power for the camera all hooked up and ready on a worktable, so all that remained for my trusty crew (my wife) and me was attaching the camera. I wove a web of zip ties across its mounting plate, and after attaching the mooring/power line to the balloon itself, used more ties to attach the camera [see "Eye Tie," inset photo]. Finally, I hooked up the dangling power line. At the last minute, I added a line of light twine as an emergency backup.
As it turned out, I had been too conservative with my fill. The balloon rose barely 10 meters before the weight of the lines proved to be too much. Without a forceful lift, the wind also played havoc, sending the mooring lines into the branches of nearby trees. We got some pictures but were unsatisfied.
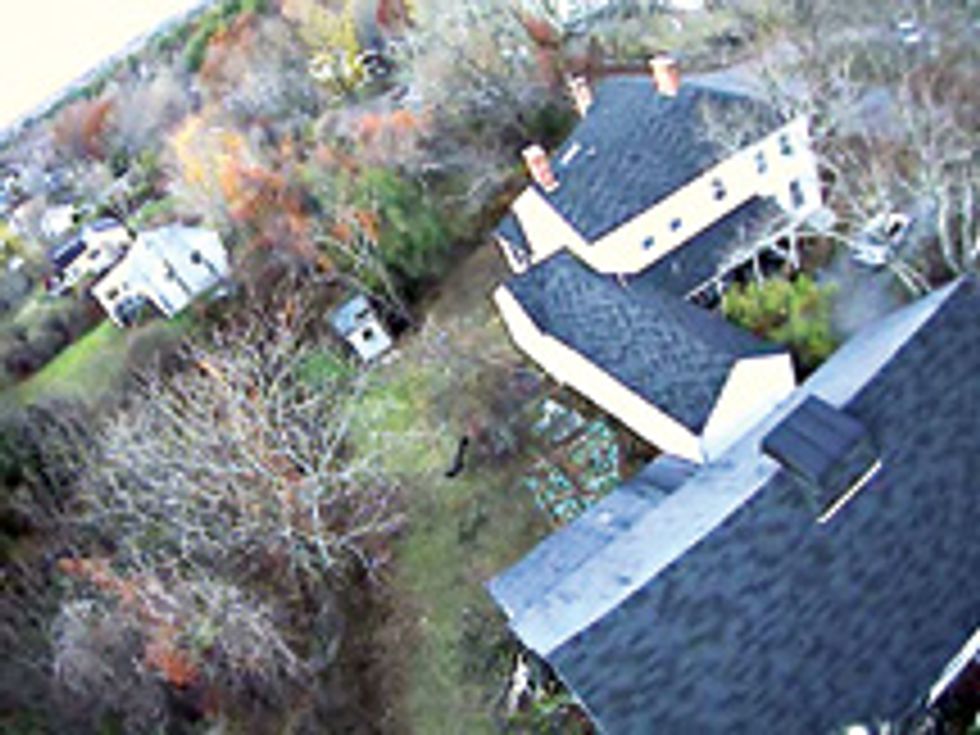
We returned to the tank and carefully remated the balloon to the inflator. After another influx of helium, the balloon easily carried the camera to the mooring lines' 30-meter limit. The Wi-Fi signal remained strong, and the camera operated perfectly, capturing some great stills and video of the neighborhood from above.
We returned later in the afternoon with our son and found that with the sun lower in the sky, the images were richer, with more vibrant colors. The winds had also died down. After another hour, we marked the day as a success and brought the balloon down to deflate it. Being a safe and mature person, I absolutely did not breathe in any of the gas, and rumors of a video of me singing Alvin and the Chipmunks songs are gross mistruths. In all seriousness, you can pass out or worse from too much helium, so be careful while deflating the balloon, and keep any fun and games to a minimum.
One final note about this project's legalities: Regardless of the size of the balloon or the weight of the payload, you should never fly a moored balloon within range of an airport (in the United States, the totally restricted airspace is in the shape of a cylinder with a radius of 8 kilometers, from the ground up). Other than that, wings up!
About the Author
JAMES TURNER is a contributing editor for O’Reilly Media and a correspondent for the Christian Science Monitor. He's been writing about his do-it-yourself projects for IEEE Spectrum readers since 2008, most recently a digital microscope and a smart power strip.